The Notes app built into Apple devices has long offered people a quick and convenient way to save lists, thoughts, and other random items. And while Apple initially shunned the bells and whistles found in the top note-taking apps, it has slowly beefed up Notes each year.
In 2021, iOS 15 and iPadOS 15 added tabs and smart folders. In 2022, Apple kicked in more enhancements with iOS 16 and iPadOS 16, such as the ability to add a quick note on your iPhone and protect a note with a passcode or biometric method. Here are 15 things you can do with the Notes app.
Before you get started, make sure you are running the latest version of the OS on your iPhone or iPad. Go to Settings > General > Software Update and you are either told that your operating system is up to date or prompted to download the latest update.
1. Add a Quick Note
Rather than having to open the Notes app to create a note, you can start one from the Control Center or a specific app to make the process quicker. In order to do this, you must be running iOS 16 or higher on your iPhone and iPadOS 15 or higher on your iPad. Those running macOS 12 Monterey or higher can also create Quick Notes on Mac.
To add the Quick Note option to Control Center, go to Settings > Control Center. Head to the More Controls section and tap the + icon next to Quick Note. You can then move to the Include Controls section and drag Quick Note by its hamburger icon if you wish to move it up in the list.
To create a Quick Note, swipe down from the top right corner to access the Control Center. Tap the Quick Note icon from the menu, then type your note. Tap Save when finished, and that note is automatically saved in the Notes app.
You can also create a Quick Note from an app, such as a website in Safari, a link on a specific webpage, or selected text on any screen. Open the app and content you want to save to a note, tap the Share icon, and then select Add to Quick Note. You can then add additional text to your note, then tap Save.
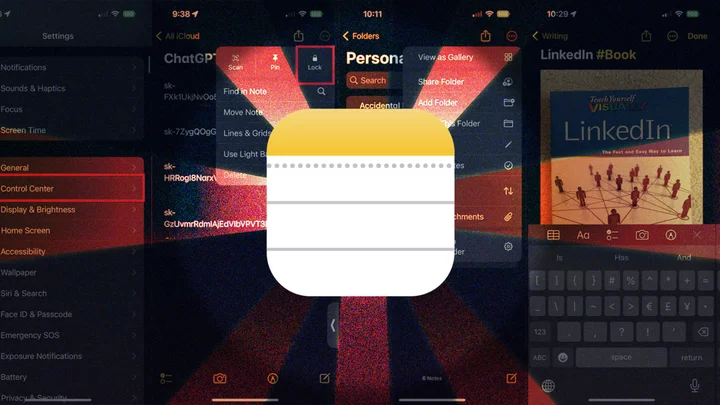
2. Lock Note with iPhone Passcode or Password
With iOS 16 and iPadOS 16, you can protect a note through a custom password, your device’s login passcode, or through Touch ID or Face ID. Note that if you use your device's passcode or biometric tech, you would need at least iOS 16, iPadOS 16, or macOS 13 Ventura to view the locked note on another device.
To lock a note, open it, tap the three-dot icon in the upper right, and select Lock. If you want to use one of your device’s authentication methods, tap Use iPhone Passcode. Enter your passcode and then choose either Touch ID or Face ID to further lock down the note.
Once a note has been locked, you must use your authentication method to unlock it again. Select the note in question, then tap the View Note link. Authenticate the note with your chosen security method, and the note will reappear on the screen.
3. Switch to Gallery View
When in List view, your notes appear by default in descending order with a title and the first few words visible. However, you can change the view to see notes as thumbnail images. To do this, tap the ellipsis icon in the Notes app and select View as Gallery from the menu.
This will display the notes as thumbnail images that display the name, part of the text in the note, and any photos that might be in the note. If the note is locked, you will only see the name and a lock icon but no text or image preview. You can return to List view by tapping the ellipsis icon and selecting View as List.
4. View All Attachments
Want to see all the photos and attachments you have stored in the Notes app? Just tap the ellipsis icon and select View Attachments to open a window with all attached media.
5. Access Folder and Note Commands
Open a specific folder or subfolder, and the ellipsis icon offers a host of other commands and options, including the ability to share the folder, sort its notes, add a new folder, move the folder, rename the folder, and convert it to a Smart Folder.
You can also open a similar menu for individual notes. Just tap the ellipsis icon to access a variety of commands allowing you to scan, pin, lock, delete, share, send, search, move, format, and print your note.
6. Organize Your Folders
The Notes app lets you easily organize your folders and notes. Press down on a note or folder and drag it to a different location in the list. If you drag a folder onto another folder, you turn it into a subfolder. The new subfolder will then be hidden from view until you open the parent folder.
You can also change a folder into a subfolder by swiping the folder to the left and tapping the folder icon. To move a note, swipe it left and tap the folder icon, then choose the new folder.
7. Sort Notes in a Folder
You can change how notes are sorted within a folder. Open the folder, tap the ellipsis icon, and select the Sort by option. By default, all notes are sorted by the last date edited, but you can sort by date created or title instead and further sort them by oldest to newest or newest to oldest (or by A-Z or Z-A, if you sort them by title).
8. Share Notes and Folders
You can share notes and folders with other people, giving them permission to just view or also make changes. You can even create a new folder specifically for sharing. Swipe the folder you wish to share to the left and tap the blue Sharing icon. Alternatively, open a note, tap the ellipsis icon at the top, and select Share Note.
From the Sharing window that opens, tap Only invited people can edit. At the next screen, choose whom you want to have access to the folder—only invited people or anyone with the link. Decide if you want other people to make changes or only view the folder and its notes. Then turn the switch for Allow others to invite on or off.
You can then share the folder via a text message, email, another app, or by copying a direct link. Select the recipients and a notification will indicate that it has been shared.
For individual notes, tap the Share icon in the upper right then use the drop-down menu to decide if you want to send someone a copy of the note or a link to the actual note to collaborate on it. Choose how and with whom you want to share the note and send the invitation.
9. Tag Your Notes
AS long as you are on iOS 15 or iPadOS 15 and higher, you can add hashtags to notes anywhere in the text or title in order to better organize them. Just type # followed by the word you want to use as a tag, then select the word as it appears in quotes above the keyboard to create your tag.
The tag can't contain spaces, but you can include hyphens or underscores. Those running an older version of iOS, iPadOS, or macOS will be able to see the tagged words, but they won’t appear as actual tags. Note that even older OS version won’t be able to see the note at all.
After you have created a tag, you can use that same tag in another note just by typing the # symbol and selecting the tag as it appears above the keyboard. To add an existing tag to multiple notes, tap the ellipsis icon and choose Select Notes. Tap all the notes you want to tag, then choose the tag option at the bottom of the screen and select the tag you want to add.
Once a tag has been created, a Tags section on the main Notes screen will appear. From here, you can tap All Tags to see every note with a tag or select a specific tag to see just those notes.
10. Create Smart Folders
You can create smart folders based on your tags and other criteria. Such folders are dynamic in that they change to automatically include any notes to which you add a specific tag. At the main Notes screen, tap the folder icon in the bottom left to create a folder and name it. Choose Make Into Smart Folder to create a smart folder.
At the next screen, select the filters you want to apply. When finished, tap Done. Your new folder then appears with all the notes using that tag. Whenever you create a new note and use that tag, it automatically gets added to this folder.
11. Send a Copy of a Note to an App
You can send a copy of a note to another app. For example, you could send a note to a file service such as Google Drive or Dropbox to store it as a separate text file. To do this, press down on the note and select Share Note from the pop-up menu. Select the app to which you want to send the copy.
12. Create a Checklist
For a makeshift to-do list app, you can create a checklist of items in the Notes app. Tap the notepad icon in the lower right to create a new note., then add a title and tap the checkmark icon. A circle appears for the first item on your checklist.
Type the entry and tap the Return key to create another circle and repeat the process as needed. Swipe any entry in the list to the right and you can turn it into a sub-item. After you have completed one of the tasks listed in the note, tap its circle to show it as completed.
The first time you do this, you are asked if you want all completed items to move to the bottom of the list. Accept this option, and each item you check then jumps to the bottom.
13. Change Text Formatting
You can quickly change the style and formatting of text. Select the text you wish to reformat. Tap the Aa button above the keyboard to choose a style, apply bold, italics, and other attributes, and set up a bulleted or numbered list.
14. Scan a Document or Photo
You can scan a document or photo to incorporate it into a note. Create a new note or open an existing one, tap the three-dot icon, and select Scan. Allow the scan to run, and the scanned image is added to your note.
15. Draw Text with an Apple Pencil
The Notes app works with Apple Pencil in iPadOS 14 and higher to offer a Scribble option that converts your handwriting into editable text. Compatible iPad models include the iPad Pro, iPad (6th generation and later), iPad mini (5th gen and later), and iPad Air (3rd gen and later).
You can use this feature in a new or existing note. Tap the Drawing icon in the upper-right toolbar and select the Apple Pencil from the palette at the bottom. Draw some alphanumeric characters and then wait to see them converted into editable text.