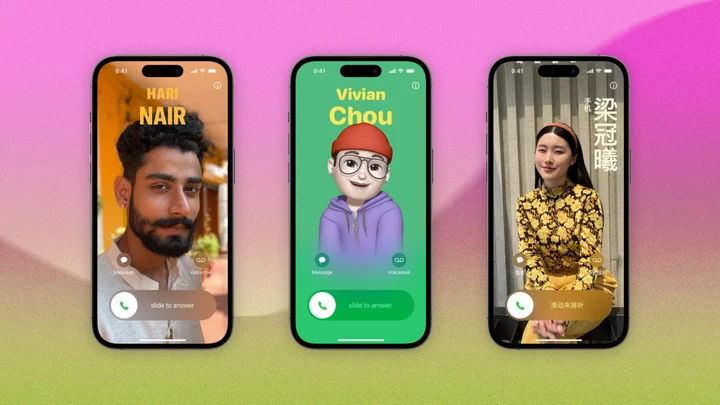
Want to share your personal information with others while also showing off a cool picture of yourself? While iPhone owners have always been able to set up a photo that appears in a small circle during calls and text conversations, Apple has now added contact posters to allow users to better express themselves.
Once you add a personalized contact poster to your contact card, it will show up as a larger image that blankets the entire screen during a phone call. It will also pop up when you share your contact card with other people through the new NameDrop feature.
In order to create and view a contact poster, iOS 17 or higher is required for both you and your contacts. Make sure you're running the most recent software by heading to Settings > General > Software Updates. You’ll be prompted to install the latest update or be told that your device is up to date. Here’s how it works.
Edit Your Contact Card
(Credit: Lance Whitney / Apple)Apple's My Card feature allows you to create a contact card that displays your name, address, phone number, and birthday. View your card by opening the Contact app on your iPhone, then tapping the My Card entry at the top of the screen. If you need to update any of the fields or add missing information, tap Edit in the upper right, make your changes, and then tap Done.
Create a Contact Poster
(Credit: Lance Whitney / Apple)To set up your contact poster, open your contact card and tap Contact Photo & Poster. Select Edit, then Customize, and choose the Poster option. The next screen allows you to create a poster from a new picture, an existing photo from your library, a Memogi, or your initials.
(Credit: Lance Whitney / Apple)To create the poster from a new photo, tap the Camera icon and snap a selfie you’d like to use. If you’re not crazy about the photo, tap Retake and try again. Otherwise, tap Use Photo. Choose Photos to add an existing photo from your library. Tap the photo you want to add.
(Credit: Lance Whitney / Apple)Another option is to use a Memoji as your poster image. You can tap the Memoji option to create a new avatar or use one you previously created. Pick your character, then select the pose and position you want to use.
(Credit: Lance Whitney / Apple)If you simply want to use your initials, select the Monogram option. By default, the initials of your first and last name are used to create the monogram, but you can modify this. Tap the small circle with your initials in the lower right and change one or both initials.
(Credit: Lance Whitney / Apple)It's worth noting that you can further edit your photos by cropping them and adding filters. You can also change the font colors for your name. When you're done editing, a Preview Poster will display how the contact poster will appear. You can then further edit the image, if needed.
(Credit: Lance Whitney / Apple)You’re then placed at the poster screen where you can see your new poster and the various ways it will display depending on the location. Now, make a phone call, place a FaceTime call without video turned on, or send someone a text message, and your contact poster will appear on the screen of the other person’s iPhone.
(Credit: Lance Whitney/Apple)Once you create your first poster, you can create another. Return to your contact card and choose Contact Photo & Poster. Tap Edit and then hit the plus (+) icon or swipe to the left and tap Create New.
Choose Your Default Poster
(Credit: Lance Whitney/Apple)If you’ve created more than one contact poster, you’re able to change the one you want to use. At your contact card, tap Contact Photo & Poster, then Edit, and swipe to the card you wish to set as the default. Tap Done > Back, and the poster you chose will appear in your contact card.
Edit a Contact Poster
(Credit: Lance Whitney / Apple)Not happy with your contact poster? You can revise it. To do this, return to your contact card and tap Contact Photo & Poster. Tap Edit, swipe to the card you want to revise, then tap Customize and choose Poster.
(Credit: Lance Whitney / Apple)You’re able to crop the image, apply a filter, move it, adjust the scale, and apply a filter. When you’re done, the different views of the card appear. Tap Back to return to your contact card.
Delete a Contact Poster
(Lance Whitney/Apple)You can also delete any of the posters you created. At your contact card, tap Contact Photo & Poster, then tap Edit and swipe to the poster you wish to remove. Swipe up on it, tap the trash can icon, and then confirm your action.

